How do I add a CAN sensor?
To add a CAN sensor, you need to click on the Add button in the Sensors section, then in the sensor type field you need to select CAN sensor type. If you wish, you can select the number of the sensor and its name, otherwise the name will be set automatically.
Next you need to select CAN sensor subtype: More details about CAN sensor subtypes and their functions in the table below:
| # | Name | Subtype Description |
|---|---|---|
| 1 | Available device settings | Template to simplify settings, selectable by sensor model |
| 2 | Current device variable | The types of variables you choose to configure depend on the template you choose |
| 3 | Address | The address of the device that translates the variable to the bus. The address of the sensors must be different in order to avoid conflicts |
| 4 | PGN | Parameter group number - Parameter group number that defines the content of the message. One PGN can have several values |
| 5 | Width | CAN bus size |
| 6 | Initial bit | Initial bit of the variable |
| 7 | Total bit | All bits of the variable |
| 8 | Timeout | Time during which the tracker will send data to the variable, if you set the timeout to 0, it will broadcast continuously |
For each of the selected subtypes, you can also configure the event that will trigger the sensor, see the table below for more information about configuring events:
| # | Name | Subtype Description |
|---|---|---|
| 1 | INPUT 0 | input with active 0 |
| 2 | INPUT 1 | Input with active 1 |
| 3 | Analog | Analog input |
| 4 | Speed | GPS speed |
| 5 | Voltage | power supply voltage |
| 6 | Movement | Drive status (moving/unmoving) |
| 7 | Overcurrent | Overcurrent exceeds the maximum current consumed by the camera |
| 8 | Ignition status | Ignition sensor status |
For each of the selected subtypes you also configure the event that will trigger the sensor more about event configuration in the table below:
| No. | Name | Event setting description |
|---|---|---|
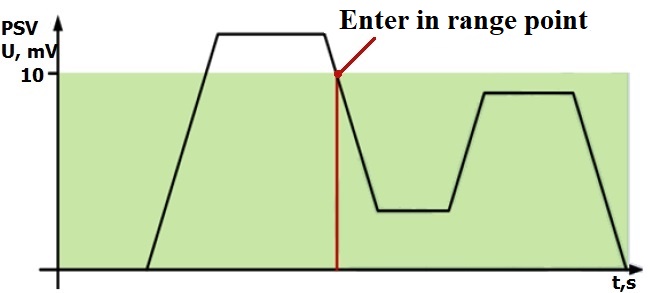
| 1 | Enter in range | If the sensor range, lower limit and upper limit are set, the event will be generated when the actual sensor value is in the set range. In other cases the information will not be transmitted. For example: the lower limit is set to 0V and the upper limit to 10V, when the voltage is below 10V the event |
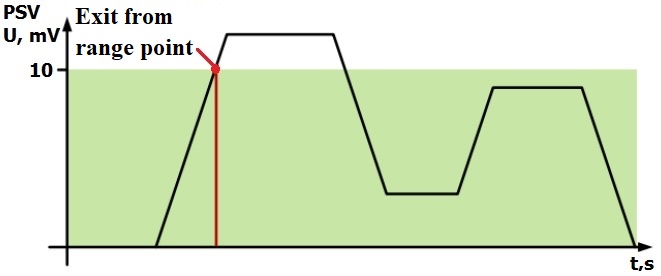
| 2 | Exit from range | The event will be generated if the actual value of the sensor exceeds the set range. For example: the lower limit is set to 0V, and the upper limit is set to 10V, when the voltage is higher than 10V the event |
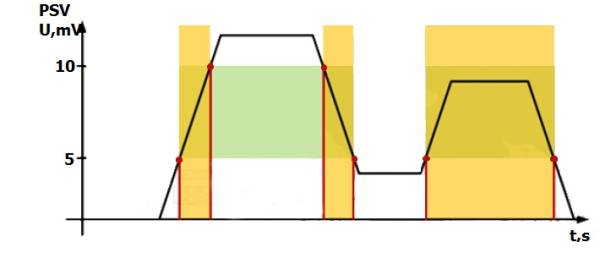
| 3 | Enter/Exit from range | The event will be generated whenever the actual sensor value crosses the set range. For example: the lower limit is set to 5V and the upper limit to 10V, when the voltage crosses the set range, an event will be generated |
| 4 | Monitoring | If this mode is selected, data will be transmitted continuously and no events will be generated |
| 5 | Monitoring and range entry | When a range entry event is generated, the actual sensor value will be transmitted to the server in monitoring mode |
| 6 | Monitoring and out of range | When an out of range event is generated, the actual sensor value will be sent to the server in monitoring mode |
| 7 | Monitoring and in/out of range | When one of the events is generated, the actual value will be transmitted to the server |
| 8 | Variable input value (delta) | A variable is set and an event will be generated when the actual value deviates by the set variable |
| 9 | Monitoring and variable input value (delta) | When a variable input value event is generated, the data will be transmitted to the server in monitoring mode |
| 10 | Upper limit | Set the upper limit for creating an event |
| 11 | Lower limit | Setting the lower limit for creating an event |
| 12 | Averaging time | The time during which an element must be in a certain state in order to generate an event is set in seconds |
| 13 | Resend interval | Interval after which the event content request will be sent again |
Event generation by range entry
Generating an event on leaving the range
Range entry/exit event generation
Once you have successfully configured the way the event is generated, you need to start selecting the content type, more details about the content types in the table below:
| # | Name | Description of subtype |
|---|---|---|
| 0 | Photo | When an event is generated, a photo is taken and sent to the server. You can set the quality of the photo, the number of photos that will be sent, the interval between them, the number of the camera from which the photo will be taken and the activity time of the relay control |
| 1 | Fixed Time Video | When an event is generated, a fixed time video is recorded and sent to the server. You can set the video quality, the number of the camera that will record, the video time and the activity time of the relay control |
| 2 | Event related video | When an event is generated, video is recorded that will be recorded until the event occurs and transmitted to the server. You can configure the video quality, the number of the camera that will record, the maximum video time in case the event is long, the video will not be longer than the interval you specified and the activity time of the relay control. |
| 3 | Timelapse Video | A video of the photo is produced before the event generation, with the set time before the event generation and transmitted to the server. You can set the number of photos, interval between photos, number of frames per second, video quality in Cameras/Timelapse Video(content 3), the number of camera that will record and the activity time of the relay control |
| 4 | Video event in the center | When an event is generated, video is recorded at the set interval to the event and the set interval after the event, and then transmitted to the server. You can set the video quality, video duration in Cameras/Timelapse/Video with event in the center(content 4) the number of camera that will record, video time and relay control activity time |
| 5 | Photo associated with the event | When an event is generated, a video with a photo is made, which is set for the time, and transmitted to the server. You can set the video quality, the interval between photos to generate the video, the maximum number of photos, the number of the camera that will record, and the relay control activity time |
| 6 | Photo+Email | When an event is generated, a photo is taken and sent to the Email you specified in Network/Email and to the server. You can set the number of the camera that will record and the activity time of the relay control |
| 7 | Sending SMS | event message is sent to your specified cell phone number in Network/GSM and server when an event is created. |
| 8 | Sending Email | When an event is generated an event message is sent to your specified Email in Network/Email and server. |


